
Keeping The Heat In - Section 7: Insulating Walls: insulating, renovating and building additions
Walls can account for about 20 percent of heat loss in houses. In addition to heat loss through the walls, there are many cracks and penetrations that allow uncontrolled air leakage into and out of the house. If you are planning to renovate the inside or the outside of your home, this section will provide information about the types of walls within a home as well as how to get the most out of your home improvements.
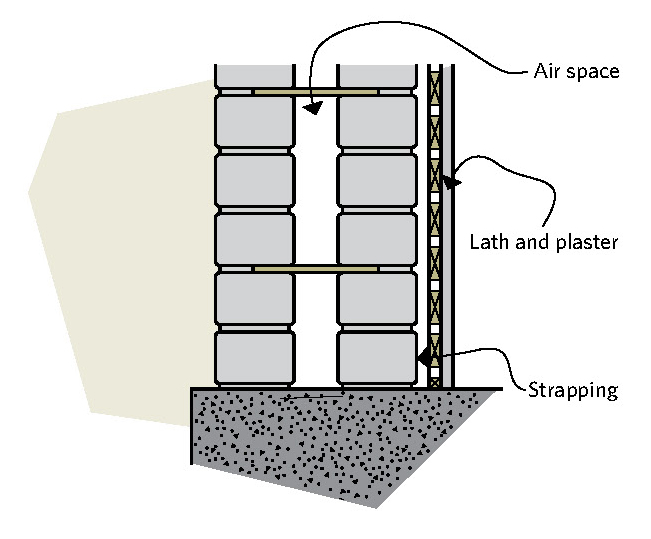
Figure 7-1 Double brick construction
Types of wall construction
There are three main types of wall construction used in Canadian houses.
i) Solid walls
Solid walls – built of brick, stone, concrete block, log or wood plank – do not have a cavity that can be insulated. The only option is to add insulation to the exterior or to the interior. Many solid walls, including double brick walls (see Figure 7-1), have a small cavity, generally less than 25 mm (1 in.), which is a drainage plane that collects and drains water out of the wall. Never insulate these cavities or plug their drain holes.
ii) Concrete block
Concrete-block walls usually have hollow cores that allow air circulation within, increasing convective heat losses. Insulating the cores offers minimal thermal resistance since the block’s internal webs and mortar will continue to act as thermal bridges. Instead, seal all possible air leakage routes into the block wall and ensure that the top course of blocks is capped. Where block walls form the party walls between housing units, air leakage often occurs in the space between the block wall and the interior finish. Make sure the space is fully air sealed.
iii) Frame walls
Frame walls have a cavity that may be insulated. Different construction techniques determine the size of the cavity and ease of access from either the interior or exterior. The wall construction also affects details that can interfere with the insulation, including top and bottom plates, fire stops, blocking, plumbing, wiring and heating ducts. A frame house with a brick veneer usually has a 25 to 50 mm (1 to 2 in.) air space between the bricks and the frame wall as part of the drainage plane. Do not insulate this space. Furthermore, insulating over the surface of an exterior wall that includes a drainage plane air space will simply not be very effective. It is better to add the insulation directly to the exterior of the frame wall and then incorporate the appropriate air barrier, drainage plane and siding, unless the specific product and its installation directions account for these requirements. The larger cavity in the frame wall can be insulated.

Figure 7-2 Wood plank construction
Opportunities for upgrading
Using dense-pack insulation techniques, empty cavity and some partially insulated cavity frame walls can be insulated from the top and bottom or from the interior or exterior. Insulating should include air sealing as described in Section 4, “Comprehensive air leakage control.”
Walls can be insulated as part of a major repair job or renovation. Interior work includes wall repairs, electrical wiring upgrades, insulation and vapour barrier installation, drywall and finishing. On the exterior, insulating can be combined with re-siding.
Address any moisture or structural problems before insulating. Indications of problems include staining, mould growth, rot, cracks on the inside and exterior wall finishes, and windows and doors that do not operate properly because they are out of square.
It is important to consider both vapour barriers and air barriers, especially when adding insulation to the interior or exterior of an existing wall. The vapour barrier must be on the warm third of the finished wall (see Figure 2-12 for more details). Also consider the location and condition of old vapour barriers, which could be as simple as plaster walls with several coats of paint.
7.1 BLOWN-IN INSULATION
Today, professional insulation contractors can blow in loose-fill insulation or inject approved foam insulation into even partially insulated wood-frame wall cavities. Using dense-pack techniques, cellulose, glass fibre and approved foams will compress existing batt insulation and fill all the remaining voids while also offering good air sealing values. Since the stud space is likely only about 89 to 102 mm (3 ½ to 4 in.) thick, thermal resistance gains may be limited, especially if the wall already contains some insulation. However, next to adding either interior or exterior insulation, good results can be had. Before proceeding, try looking behind electrical outlets – with the power off – to find out what already exists in the walls.
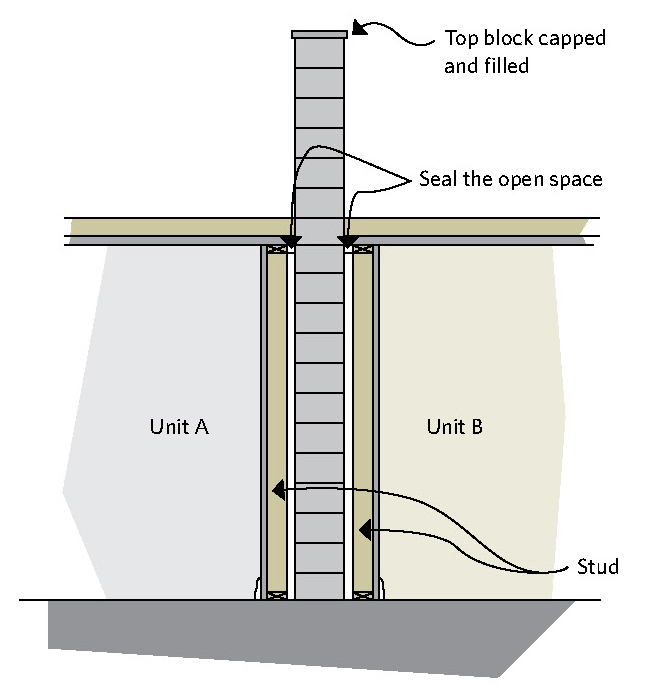
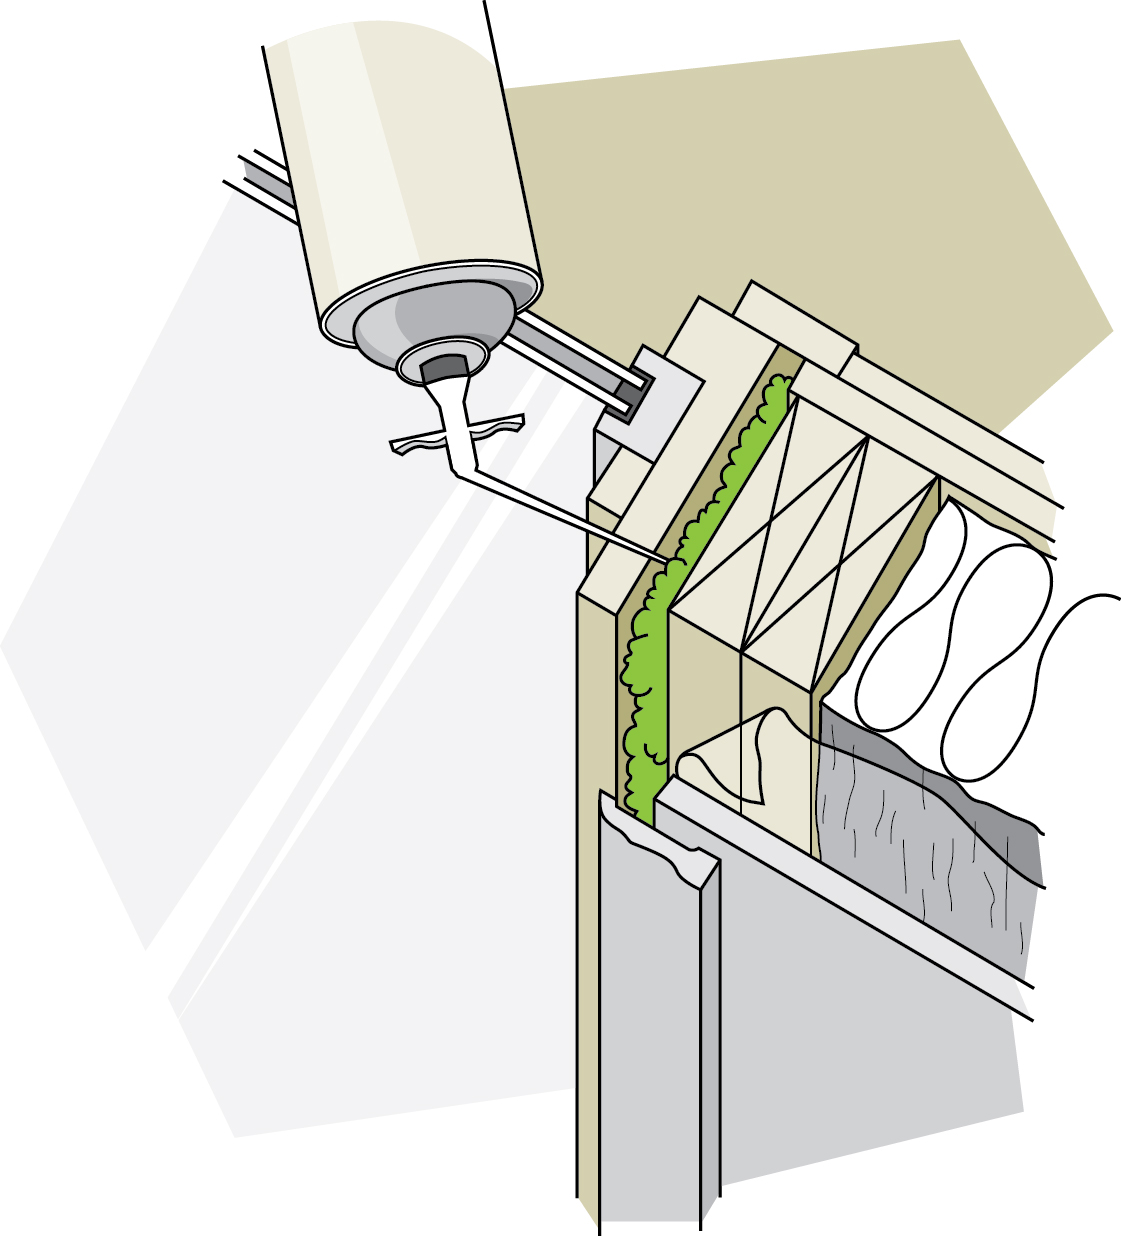
Figure 7-3 Concrete block construction, a party wall with an open wall
To insulate, small holes must be drilled into each stud space. In most cases, one to five holes must be drilled per storey, including those above and blow windows and doors. A long tube is inserted through each hole into the cavity from the top or the bottom of the stud space. The hose is then withdrawn in stages to allow the space to be filled to the proper density.
To help choose the right product for your job, review the characteristics of blown-in and foamed-in insulations as outlined in Section 3, “Materials.”
Choose your insulation product and installation method carefully. Consult closely with a contractor with a proven track record to obtain the best results. Stipulate the manufacturer’s recommended densities for the material in the contract with the installer. The contractor will need to verify the amount and density of the application and then you and the contractor should agree on the number of bags or containers to be used.
Only a small variation from this target is acceptable as too little will leave voids and/or settling gaps in the walls. If too much is used, some of the insulation may be escaping from the wall into the floor space or some other area where it is not needed. Too high
a density can cause walls to bulge. Also verify with the contractor exactly how the holes will be sealed, patched and finished.
Installing the insulation
There are three ways to install the insulation:
- from the inside
- from the outside
- from the basement/attic
i) From the inside
Small holes of 15 to 50 mm (? to 2 in.) are drilled through the inside wall finish and the insulation is blown or injected directly into the wall. The holes must then be completely plugged and sealed.
Figure 7-4 Potential blockages in the wall, including wires, pipes, blocking, windows and doors
If you must replace or re-cover the interior finish, it should be possible to
- drill the holes
- blow in or inject the insulation
- install a well-sealed air and vapour barrier on top of the old interior wall
- apply new drywall and finish
ii) From the outside
Most types of exterior siding can be drilled, lifted or removed to access the stud wall behind. In some cases, brick siding can have single bricks temporarily removed leaving sufficient space to repair holes in the sheathing. Ideally, two stud spaces can be filled from one brick space, though each stud space may require two or more holes with this method. Do not insulate the drainage cavity between the brick veneer and the stud walls. Make sure the installer patches the holes section by section rather than leaving them all until the end to avoid water entry if a storm occurs.
iii) From the basement/attic
This can be the easiest approach if access can be gained and if the cavity is open from top to bottom such as with balloon frame construction. All stud spaces need to be filled, but there should be allowance for windows and doors, fire stops, cross braces and other obstructions in the wall cavity. The contractor will check to see if the wall should be filled from the top, bottom or both, depending on obstructions (see Figure 7-4). After the wall is filled, ensure that the access holes are tightly sealed.
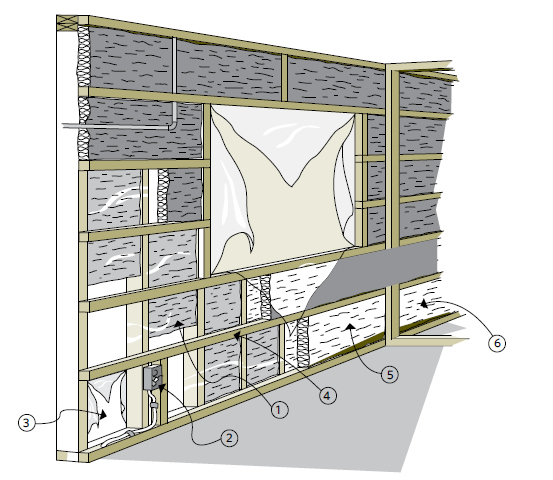
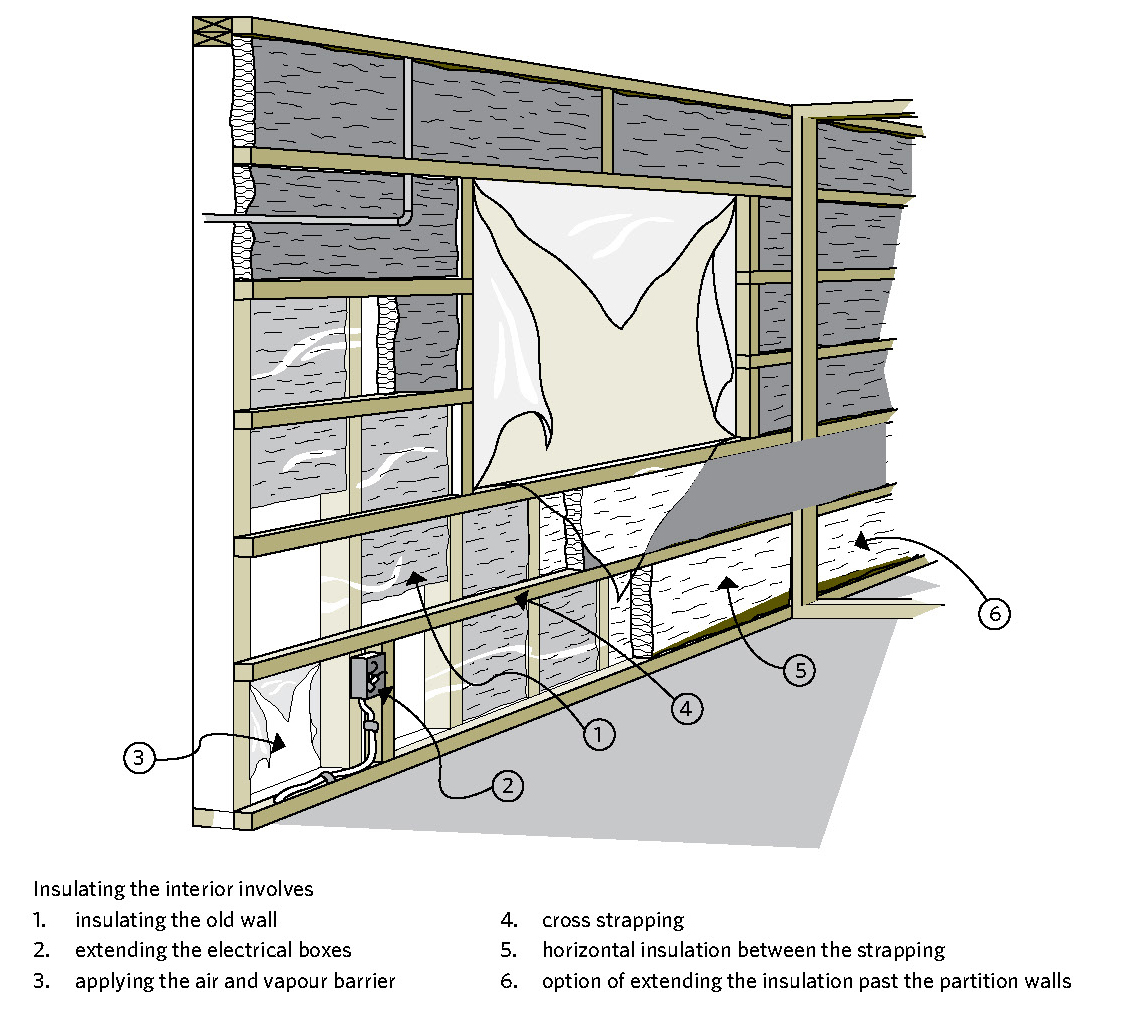
Insulating the interior involves
- insulating the old wall
- extending the electrical boxes
- applying the air and vapour barrier
- cross strapping
- horizontal insulation between the strapping
- option of extending the insulation past the partition walls
Figure 7-5 Two thirds or more of the total insulating value must be on the cold side of the air and vapour barrier
7.2 RENOVATING THE INTERIOR
If your plans involve extensive renovation, you have two options: you can rebuild the existing wall or build a new wall on the inside of an existing one.
7.2.1 Rebuild the existing wall
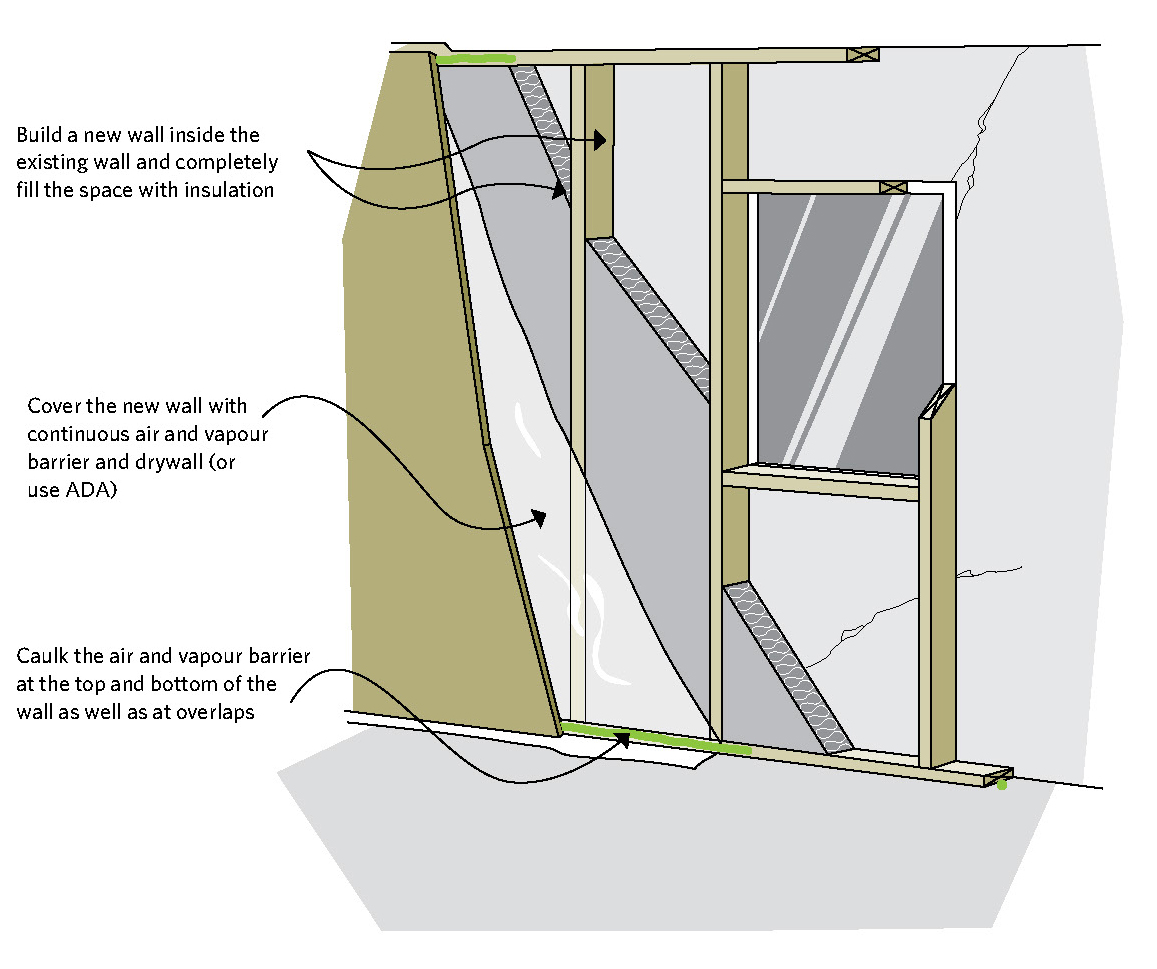
Figure 7-6 Building a new wall on the interior of an existing wall
Remove the existing wall board or plaster from a wood frame wall, add or upgrade the existing wall cavity insulation and then install the vapour barrier, new drywall and finish. Better yet, reduce thermal bridging by upgrading the stud cavity and adding 50 mm x 50 mm (2 in. x 2 in.), 50 mm x 76 mm (2 in. x 3 in.) or even 50 mm x 89 mm (2 in.x 4 in.) horizontal strapping, and fill the space with insulation.
Add a vapour barrier on the warm side of the wall within the first third of the thermal resistance value of the overall wall insulation. See the 1/3 – 2/3 rule in Part 2.4, Control of moisture flow.
Alternatively, after filling the cavity with insulation, screw or nail the rigid foam board directly to the exposed studs. Foam board materials, with their high RSI (R) value, use less interior space and provide a thermal break. Depending on the type and thickness of the foam board used, either seal the foam board to act as a vapour barrier or install an approved vapour barrier (see Section 3, “Materials”).
If you are considering having spray-foam professionally installed, there are two basic techniques – one that uses low-density spray foam and the other, high-density spray foam.
For low-density applications, you can choose to remove any existing wall cavity insulation and fill the cavity or better yet, strap the wall and then fill the full, deeper space. The low-density foam will act as an air barrier, but you will have to install an additional vapour barrier before covering the wall with drywall and finishing.
For high-density spray foam, first strap the wall to create a deeper cavity. Then spray a continuous layer of foam (minimum 50 mm [2 in.]) against the exterior sheathing and also cover the framing members. Fill the rest of the cavity with your choice of insulation (e.g. low-density spray foam, glass, mineral or cellulose fibre). Since the high-density spray foam acts as a vapour barrier, the wall does not need a polyethylene vapour barrier. Instead, before finishing the wall, install a smart barrier or use the ADA method as described in Part 6.2.3, Frame wall with single or double layer of batt insulation.
7.2.2 Build a new wall on the inside of an existing one
With both wood frame and masonry walls, you can build a new insulated wall onto the existing one. The new frame wall can be installed any distance from the old wall as long as all cavities are filled with insulation (see Figure 7-6). If you ensure that a new, well-sealed vapour barrier is installed, there is no need to remove or damage any existing vapour barrier.
In both options noted above, follow the relevant part of the instructions for insulating a basement from the inside. This includes sealing air leaks, framing the new wall, framing around window and door openings, insulating (ideally in two layers so there are no gaps), installing an air and vapour barrier, and applying the new finish. For more details, see Part 6.2, Insulating the basement from the inside.
Additional points
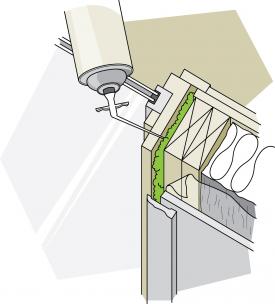
Figure 7-7 Low expansion foam insulation can seal gaps around window and door frames
- When installing the air and vapour barrier, cover the entire wall area, including window and door openings (see Figure 7-5). (Later, this will be cut with a large X – from corner to corner – and the flaps sealed to the frame.) Make sure the air and vapour barrier is well sealed at all joints, openings and penetrations.
- Though it may be difficult, plan for the insulation to extend behind any obstructions (e.g. pipes, electrical boxes and heating ducts), so that these are on the warm side of the insulation. New and existing electrical boxes need to be moved into the new wall and installed in poly pans that are sealed to the new air and vapour barrier. Plumbing pipes should be moved into the new wall or carefully insulated only from behind to prevent freezing and bursting. Any air duct joints must be air sealed with approved sealants.
- If you are rebuilding the existing wall, seal all cracks around door or window frames with non-expanding polyurethane foam sealant or stuff the gap with insulation or backer rod and caulk. If installing a new wall, it is usually not necessary to install extra framing around windows and doors, as the new wall is non-load bearing.
- Consider extending the insulation past junctions at partition walls. To do this, remove the drywall on the partition wall back one stud space and cut back the partition wall enough to extend the insulation and seal the air and vapour barrier through the partition wall.
- As a fast option to increase the wall RSI value while reducing thermal bridging, install at least RSI 0.88 to 1.76 (R-5 to 10) rigid board insulation directly to the wall finish and cover it with drywall. You will still need to ensure the vapour barrier is sealed and will have to reposition such things as electrical switches and plugs. Seriously consider having insulation blown or injected into the wall cavities at the same time.
7.3 RENOVATING THE EXTERIOR
It is always best to remove the existing siding and perform any upgrades to the structure, wiring, plumbing, cavity insulation and the vapour and air barrier before installing additional insulation under new siding (see Figure 7-8). However, rigid board or batt or blanket insulation can be applied on top of old siding.
Points to keep in mind:

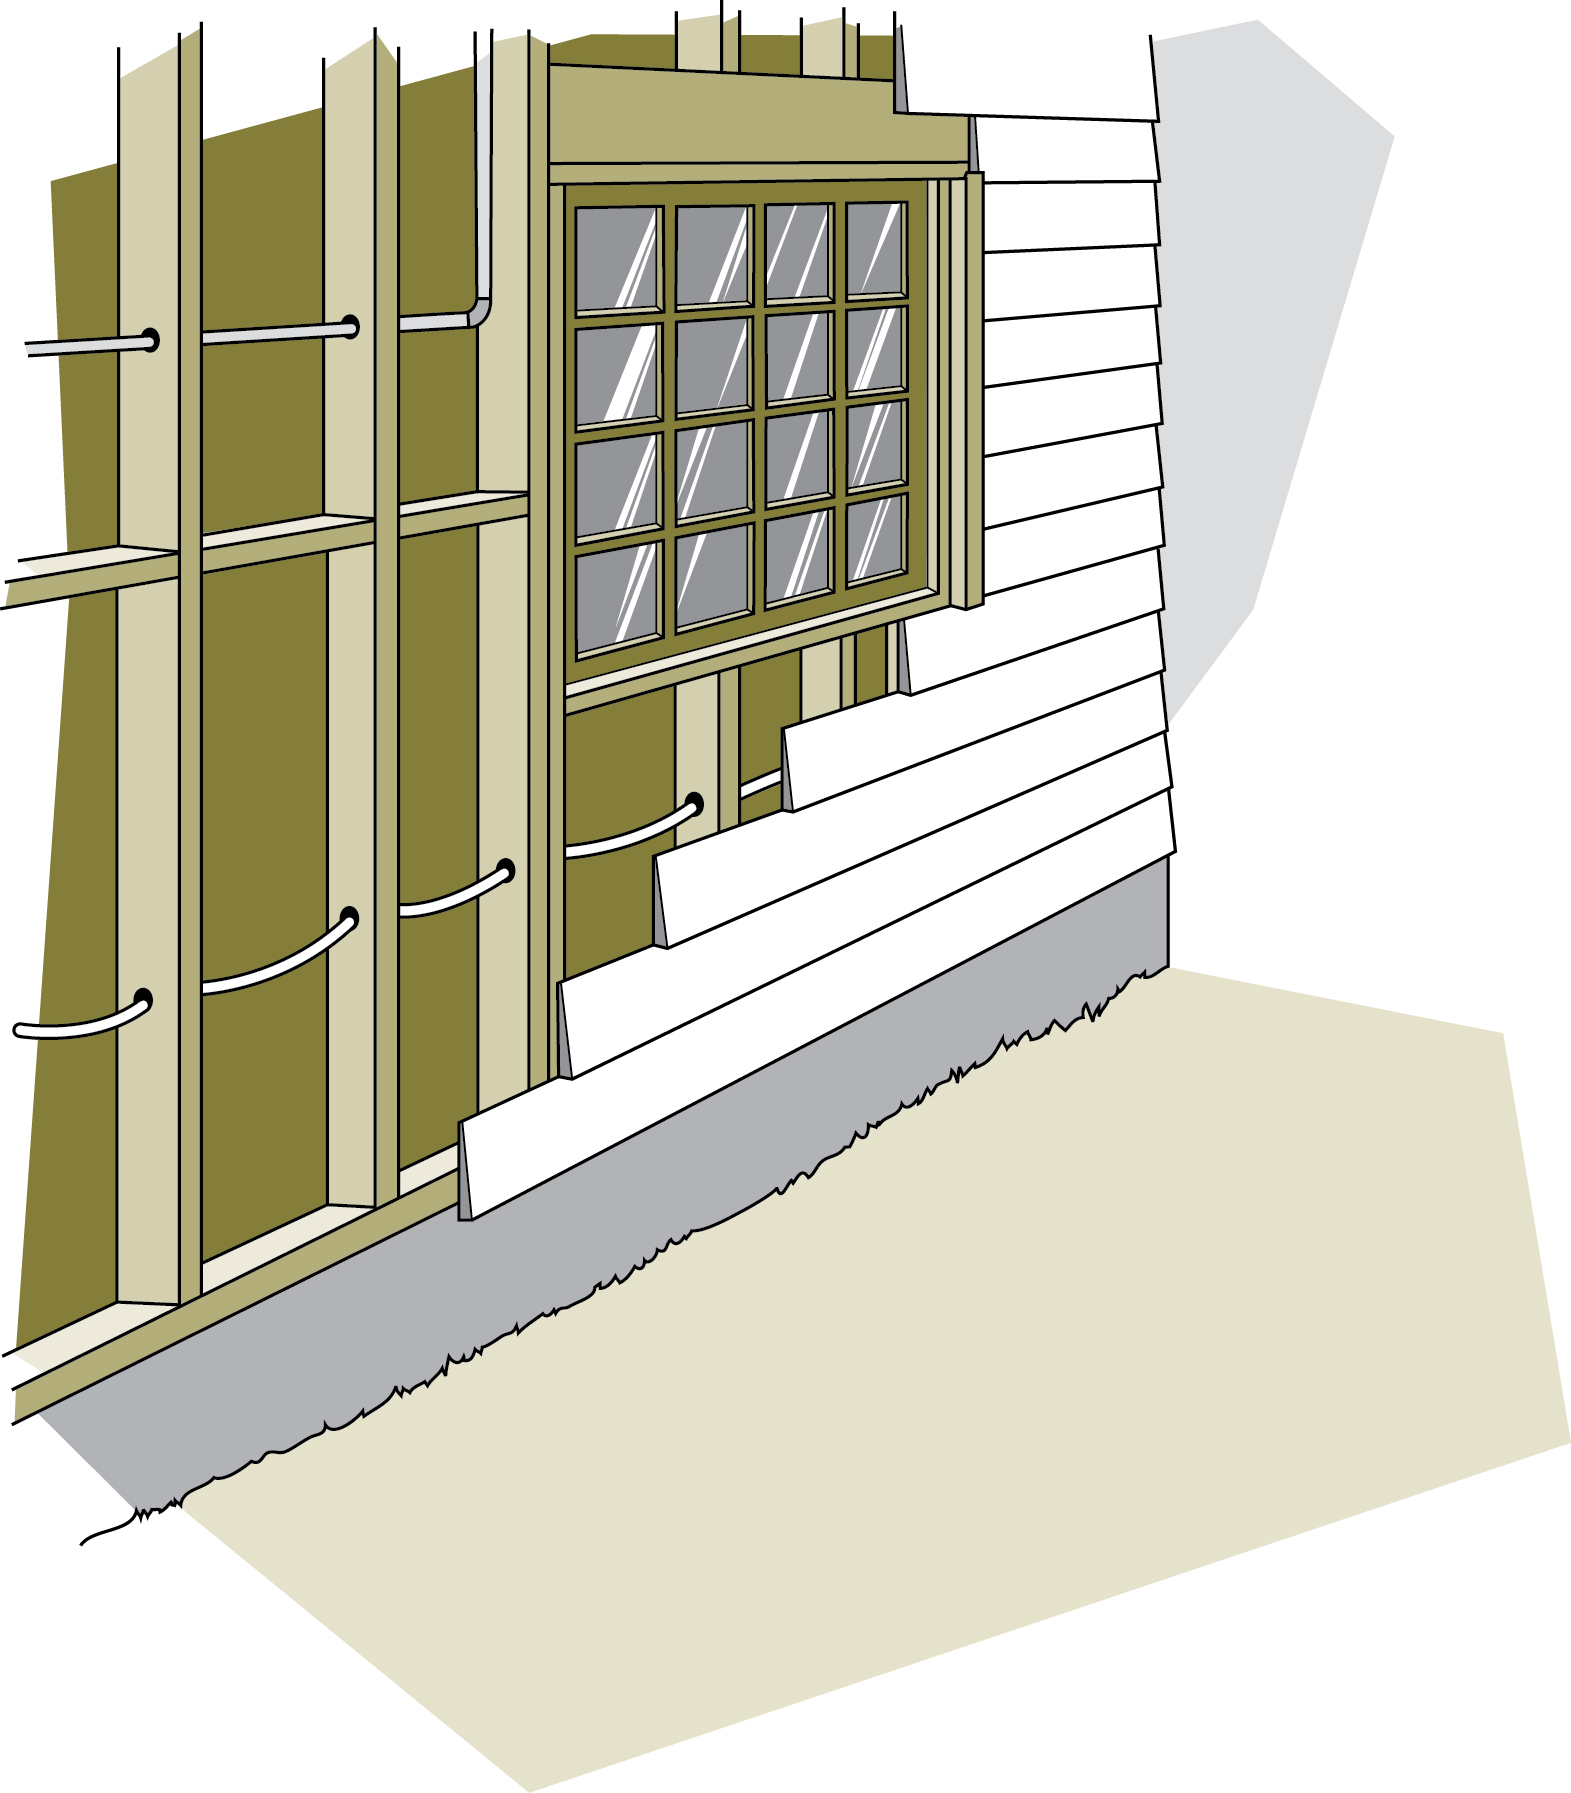
Figure 7-8 Adding insulation to the exterior
- Significant amounts of insulation can be added since space is usually not a limitation, except in the case of lot-line restrictions or limited roof overhangs.
- Make allowances for extending window and door jambs, and for other penetrations such as vents, electrical service, gas and oil pipes, and for eavestroughs and downpipes.
- Consider extending the new insulated wall down past the rim joist area to help seal this notorious air leakage area. The wall can be extended to a minimum of 200 mm (8 in.) above grade without having to use materials that are not subject to degradation from contact with the soil. In addition, if the basement is not already insulated, consider extending insulation a minimum of 610 mm (24 in.) below ground level over the foundation wall. For details, see Figure 6-8 and Part 6.1, Insulating the basement from the outside.
- Consider the location of the vapour barrier. If the new insulation has at least twice the insulating value of the old wall, then a new vapour barrier can be installed over the old wall before installing the new wall, insulation and air barrier. This is most often the case with solid masonry walls and can be done with a continuous and well-sealed polyethylene sheet or high-density spray foam. Alternatively, a new air barrier can be installed on the exterior and the existing vapour barrier left on the inside. This new air barrier, typically spun polyolefin, can be of any material that prevents air from moving through the wall. Ensure that all penetrations, seams, joints and the perimeter edges are sealed to prevent air from getting around or through the air barrier. Where the air barrier extends to below the rim joist area, seal and mechanically fix it to the foundation.
- If included, limit any air space depth to no more than 10 mm (3/8 in.) between the existing wall air/vapour barrier and the new construction. This space may be built in to help ensure that any moisture that permeates through the existing wall can escape to the exterior. This space will reduce the effect of any overlying insulation by about 5 percent.
- Any new exterior framing generally requires a top plate along the soffit and a bottom plate or box beam attached to the foundation wall. In some cases you may have to extend framing up into the eaves, which is not a problem if you are planning to replace the soffits. Ensure that the air barrier at the top is sealed through to the old wall so air cannot get around it. Also ensure that adequate roof ventilation is maintained if you change the soffit ventilation space.
- Ensure that the eaves will prevent wind-blown water from getting in between the insulation and the siding. If necessary, add flashing at the top of the insulation and caulk the top joints for good measure.
Rigid board insulation
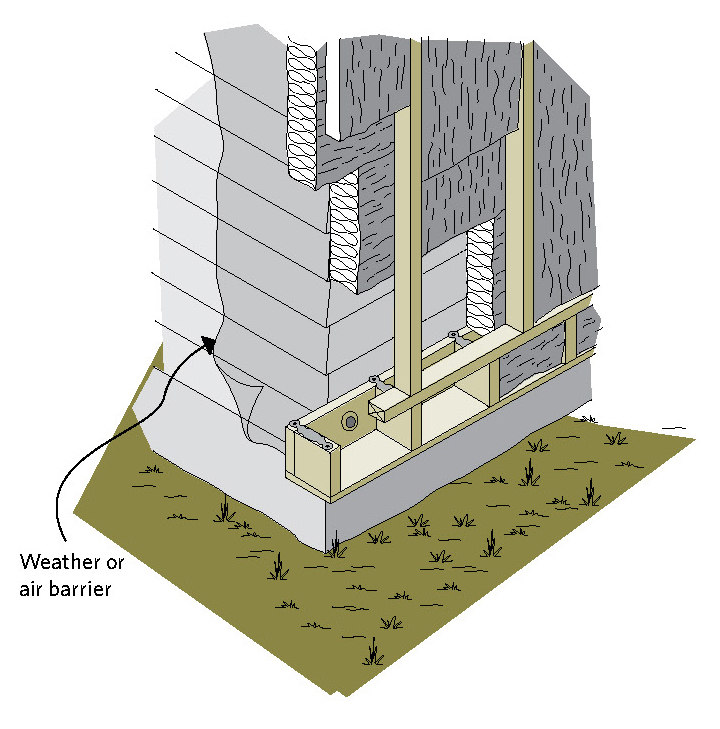
Figure 7-9 The box beam can overlap at corners
- Any type of rigid board insulation can be used. However, check with your local building authority to confirm the minimum RSI values, air barrier and vapour barrier code requirements. Typically, impermeable foam board with more than a true (i.e. not system-based) RSI value of 1.14/25 mm (R-6.5/in.) is suspect (see Part 3.1, Insulation).
- Fasten the rigid board insulation in place with the appropriate fasteners as specified by the manufacturer or supplier.
- Ensure the framing and insulation fit snugly together without unintentional gaps.
- Check the siding manufacturer’s recommendations for the required type and length of fasteners to use on top of rigid board insulation.
- Insulated siding (often polyurethane and polystyrene foam bonded onto the back of aluminum or vinyl siding) is an alternative to the more reliable method of separate insulation and siding. In general, the insulating value – RSI 0.35 to 0.70 (R-2 to 4) – is not high. The siding should incorporate a drainage feature. If it does not, add a drainage plane to remove wind-blown precipitation and interior escaping moisture.
- Applying vertical or diagonal strapping on top of the insulation has several advantages. It allows for the installation of a drainage plane and reduces heat buildup behind the siding. It also provides a nailing surface for the siding while reducing thermal bridging.
Batt/blanket insulation
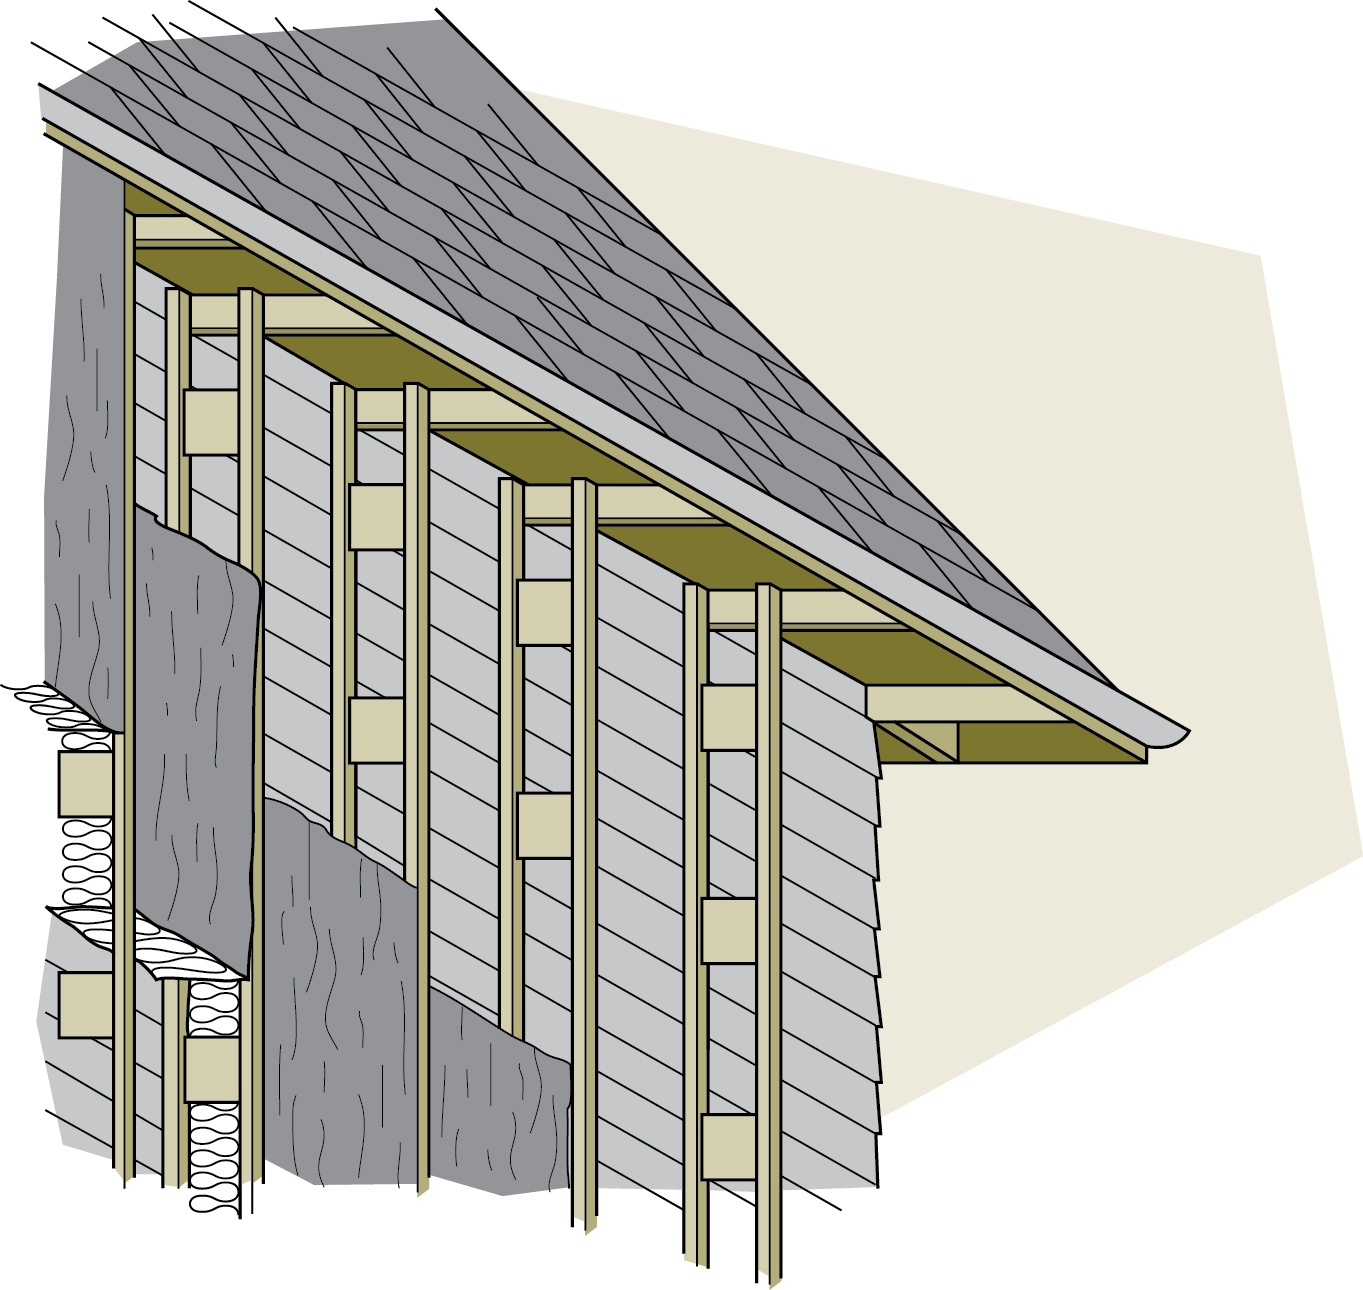
- Build a wooden framework on top of the entire outside wall to hold the insulation and support the new siding (see Figure 7-10). Ensure the air and vapour barriers are properly installed.
- Alternatively, a lightweight frame wall (such as a Larsen truss) can be hung from the rafters or supported on a bottom plate out from the old wall. This would allow two layers of snugly installed batt type insulation, one horizontally behind the frame, the other vertically between the studs. Using this method, RSI 3.5 (R-20) or higher can be installed.
7.4 MISCELLANEOUS SPACES: ATTACHED GARAGES AND MORE

Figure 7-10 Trusses can be hung from the rafters and nailed to the existing wall
Heat moves in all directions, so walls and floors must be insulated where they separate a heated space from an unheated space. This is commonly found with bonus rooms, which is where a living space is created above an attached garage.
Attached unheated garage
The walls, ceiling and door adjoining the house must be insulated and air sealed to reduce heat loss and prevent garage fumes from entering the house. Refer to Part 7.1, Blown-in insulation, and Part 7.2, Renovating the interior, for instructions on wall insulation if the garage is above ground, or Section 6, “Basement insulation,” if it is below ground level.
If the garage ceiling is open and the joists are visible, proceed as outlined for open foundations (see Part 6.4, Open foundations). It is best to remove an existing garage ceiling finish to air seal and insulate it properly.
Where a finished ceiling exists in the garage, a contractor may be able to blow dense-pack insulation into the space between it and the floor above. All holes cut in the ceiling should be carefully re-sealed to prevent any garage fumes from leaking into the rooms above, and all house ducts must be sealed with an approved sealant.
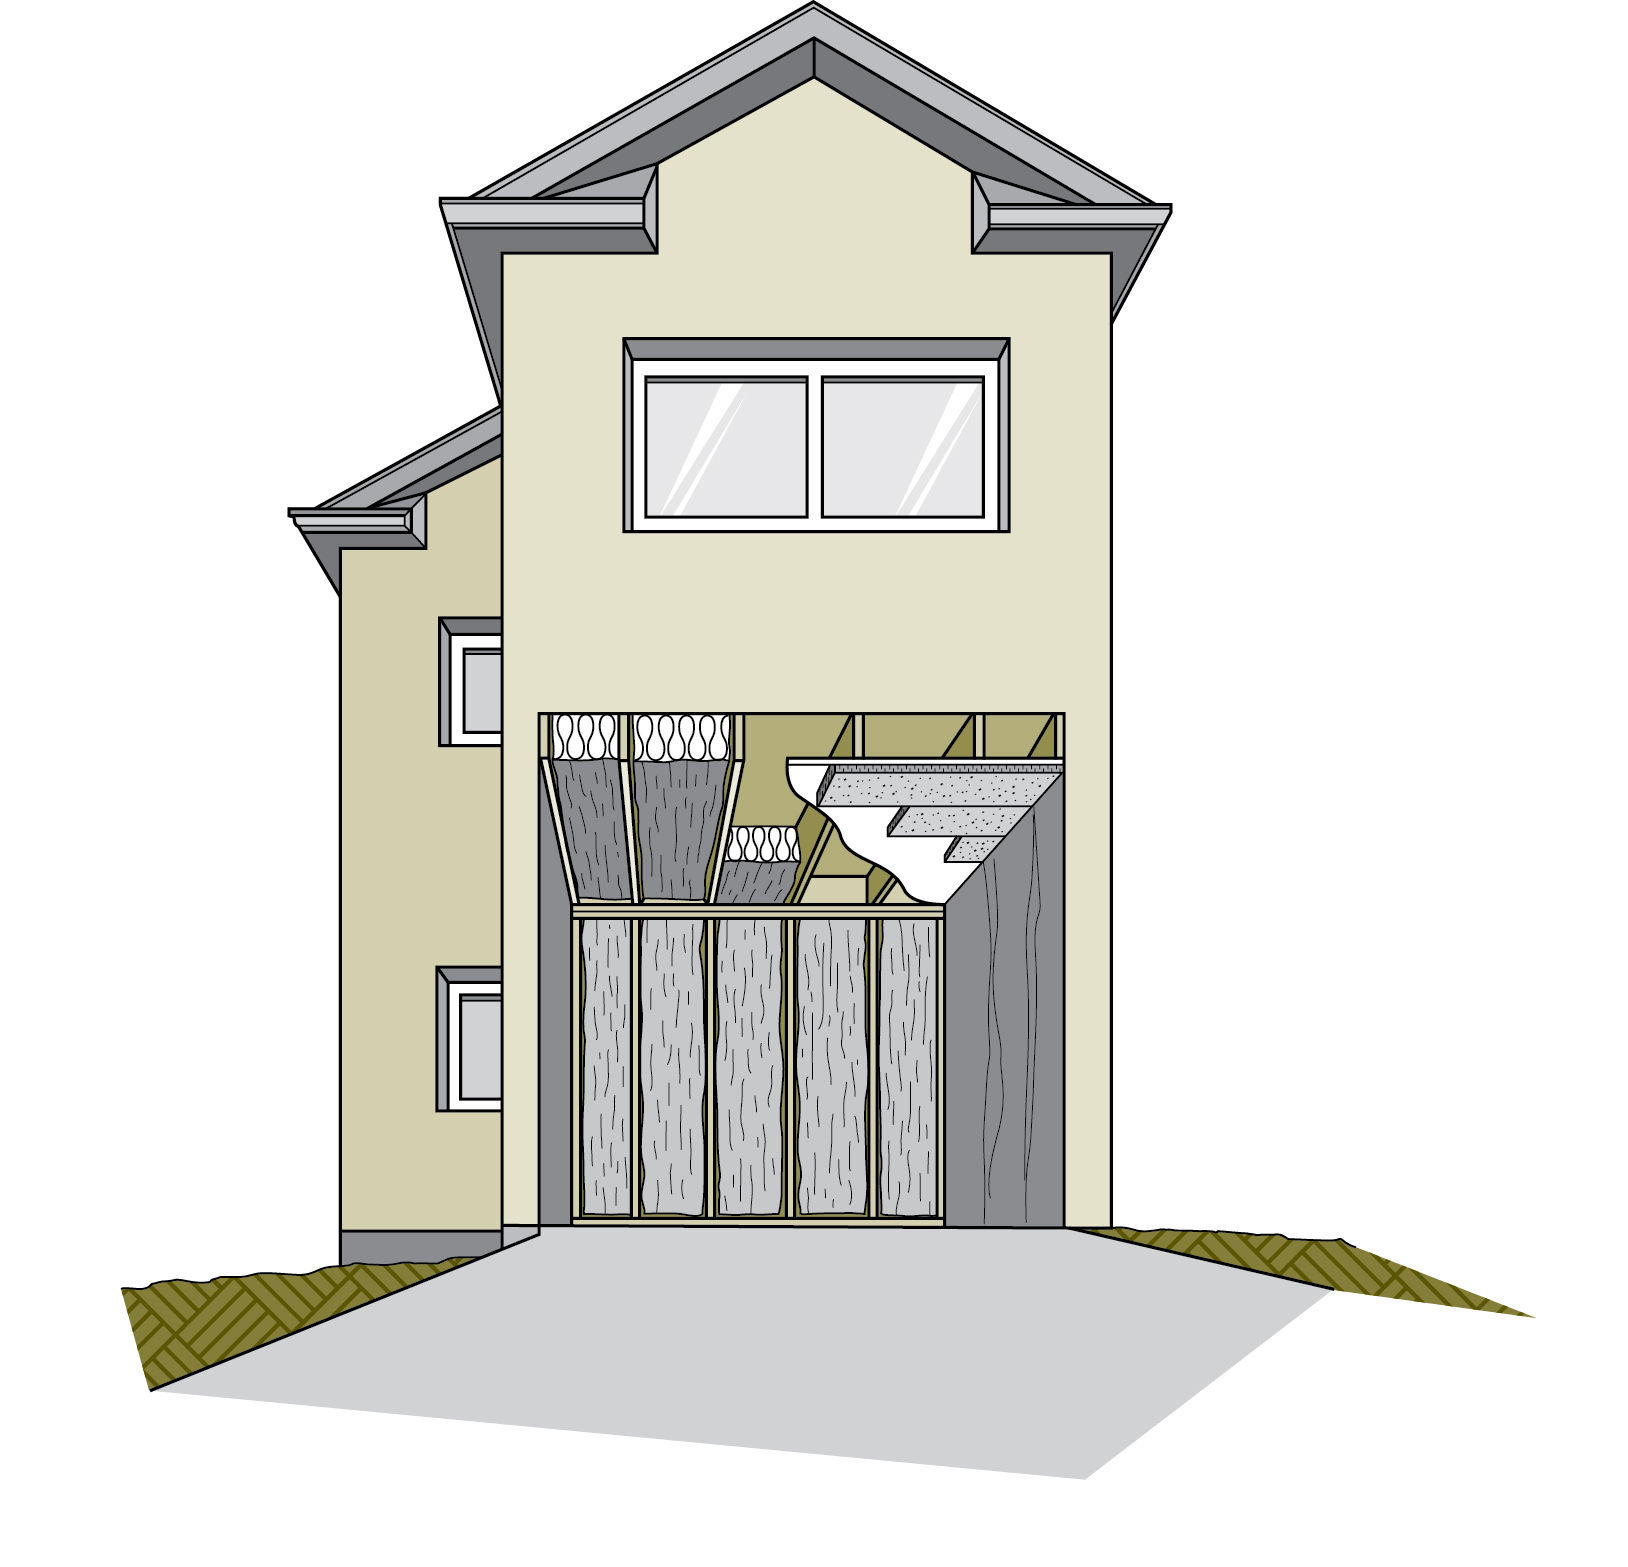
Figure 7-11 Air seal and insulate between an unheated garage and the house
Many contractors recommend the use of professionally installed spray foam against the bottom of the floor above if there is no ceiling finish as this space is notoriously difficult to air seal. This can create a vapour barrier, an air barrier and a good initial insulating layer. Fill any remaining space with additional insulation. Any exposed spray foam will have to be covered with either drywall or approved fire-rated overspray.
If there is a ceiling finish that you do not want to remove, you can nail rigid board insulation and drywall to it as long as the surface is fairly even. Before adding the rigid board insulation, seal all potential leakage paths to prevent air from bypassing the insulation. This is especially important along any junction of the ceiling and walls where you may have to seal the cavity and spaces within the surrounding walls that typically leak into the ceiling. Seal this area with spray foam or with sections of impermeable rigid board insulation caulked between the joists (see Figure 7-11).
SAFETY WARNING:
Never run heating supply and return ducts from the house into a garage because this is dangerous and violates all codes. See Section 9, “Operating your house.”
7.5 ADDITIONS AND NEW CONSTRUCTION
Renovating often involves some new construction such as the addition of a room or wing. New construction provides an opportunity to install a continuous air and vapour barrier and high levels of insulation in an efficient and cost-effective way.
Figure 7-12 shows a typical cross-section of new construction from the roof to the footings. Note how both the insulation and air barrier run continuously without breaks or thermal bridging.
Renovations also allow for current or future allowances of renewable energy and other energy-efficient features into your home such as solar water heating, passive solar heating, radiant-ready in-floor heating and photovoltaic power generation.
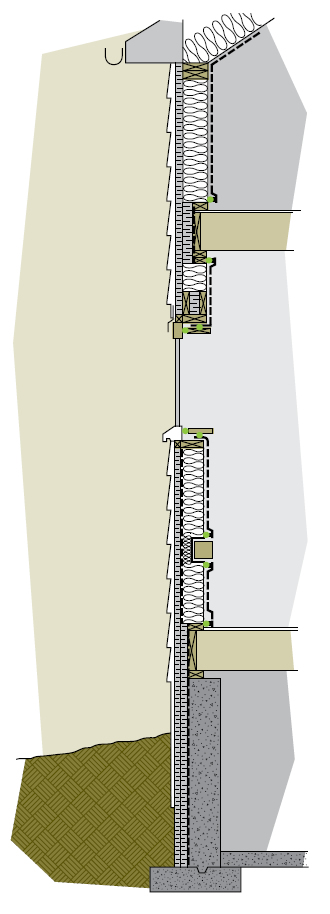
Attic
High levels of insulation, a continuous air and vapour barrier and ventilation are the features of an energy-efficient attic. Roof trusses are available that allow high insulation levels above the top plate of the outer walls. These include raised heel trusses for flat ceilings, scissor trusses for cathedral ceilings and parallel chord trusses for flat roofs.
Walls
The section in the illustration at the right shows a 2 x 6 wall with insulating sheathing. Other wall systems include interior cross strapping, double-wall systems and the use of trusses. These systems allow the continuous air and vapour barrier part way in the wall. Note the recessed headers that allow room for the continuous air and vapour barrier and extra insulation.
Windows
High-performance ENERGY STAR® windows are used where possible. Most windows face south. All windows are sealed to the air barrier.
Foundation
The foundation has full-depth insulation – in this example, on the exterior. Proper damp proofing, a drainage system and a sloped grade help ensure a dry basement.
Mechanical systems
Space heating and cooling systems are smaller for well-insulated and air-sealed homes. High-efficiency space and water heating equipment can use directly connected combustion air and avoid using household air to operate.
Figure 7-12 Exterior wall cross-section
Back: Section 6: Basement insulationNext: Section 8: Upgrading windows and doors
Page details
- Date modified: